| Home | All Classes | Main Classes | Annotated | Grouped Classes | Functions |
This example shows how to create and connect together several widgets by using signals and slots, and how to handle resize events.
/****************************************************************
**
** TQt tutorial 5
**
****************************************************************/
#include <ntqapplication.h>
#include <ntqpushbutton.h>
#include <ntqslider.h>
#include <ntqlcdnumber.h>
#include <ntqfont.h>
#include <ntqvbox.h>
class MyWidget : public TQVBox
{
public:
MyWidget( TQWidget *parent=0, const char *name=0 );
};
MyWidget::MyWidget( TQWidget *parent, const char *name )
: TQVBox( parent, name )
{
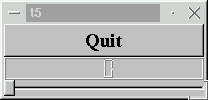
TQPushButton *quit = new TQPushButton( "Quit", this, "quit" );
quit->setFont( TQFont( "Times", 18, TQFont::Bold ) );
connect( quit, TQ_SIGNAL(clicked()), tqApp, TQ_SLOT(quit()) );
TQLCDNumber *lcd = new TQLCDNumber( 2, this, "lcd" );
TQSlider * slider = new TQSlider( Horizontal, this, "slider" );
slider->setRange( 0, 99 );
slider->setValue( 0 );
connect( slider, TQ_SIGNAL(valueChanged(int)), lcd, TQ_SLOT(display(int)) );
}
int main( int argc, char **argv )
{
TQApplication a( argc, argv );
MyWidget w;
a.setMainWidget( &w );
w.show();
return a.exec();
}
    #include <ntqapplication.h>
    #include <ntqpushbutton.h>
    #include <ntqslider.h>
    #include <ntqlcdnumber.h>
    #include <ntqfont.h>

    #include <ntqvbox.h>
Three new include files are shown here. ntqslider.h and ntqlcdnumber.h are there because we use two new widgets, TQSlider and TQLCDNumber. ntqvbox.h is here because we use TQt's automatic layout support.
    class MyWidget : public TQVBox
    {
    public:
        MyWidget( TQWidget *parent=0, const char *name=0 );
    };
    MyWidget::MyWidget( TQWidget *parent, const char *name )
            : TQVBox( parent, name )
    {
MyWidget is now derived from TQVBox instead of TQWidget. That way we use the layout of the TQVBox (which places all of its children vertically inside itself). Resizes are now handled automatically by the TQVBox and therefore by MyWidget, too.
TQLCDNumber *lcd = new TQLCDNumber( 2, this, "lcd" );
lcd is a TQLCDNumber, a widget that displays numbers in an LCD-like fashion. This instance is set up to display two digits and to be a child of this. It is named "lcd".
        TQSlider * slider = new TQSlider( Horizontal, this, "slider" );
        slider->setRange( 0, 99 );
        slider->setValue( 0 );
TQSlider is a classical slider; the user can use the widget to drag something to adjust an integer value in a range. Here we create a horizontal one, set its range to 0-99 (inclusive, see the TQSlider::setRange() documentation) and its initial value to 0.
connect( slider, TQ_SIGNAL(valueChanged(int)), lcd, TQ_SLOT(display(int)) );
Here we use the signal/slot mechanism to connect the slider's valueChanged() signal to the LCD number's display() slot.
Whenever the slider's value changes it broadcasts the new value by emitting the valueChanged() signal. Because that signal is connected to the LCD number's display() slot, the slot is called when the signal is broadcast. Neither of the objects knows about the other. This is essential in component programming.
Slots are otherwise normal C++ member functions and follow the normal C++ access rules.
The LCD number reflects everything you do to the slider, and the widget handles resizing well. Notice that the LCD number widget changes in size when the window is resized (because it can), but the others stay about the same (because otherwise they would look stupid).
(See Compiling for how to create a makefile and build the application.)
Try changing the LCD number to add more digits or to change mode. You can even add four push buttons to set the number base.
You can also change the slider's range.
Perhaps it would have been better to use TQSpinBox than a slider?
Try to make the application quit when the LCD number overflows.
You're now ready for Chapter 6.
[Previous tutorial] [Next tutorial] [Main tutorial page]
| Copyright © 2007 Trolltech | Trademarks | TQt 3.3.8
|